- Commissioning
- Connect devices
- Alfen Eve Single
Alfen Eve Single
This page describes how to connect an Alfen Eve Single charging station to the SOLARWATT Manager.
Table of contents
Compatibility
| EnergyManager pro | Manager flex | Firmware | |
|---|---|---|---|
| Eve Single (S-line/Pro-Line)* |
|
| > 4.12. |
*) "Load Balancing Active" software license required. SOLARWATT offers the Alfen Eve Single line wallboxes with and without activated "Load Balancing Active" software license.
Information on this can be found in the product description in the SOLARWATT Shop. For devices without an activated software license, the "Load Balancing Active" software license can be purchased and activated subsequently via SOLARWATT.
| Full compatibility | |
| With restrictions | Automatic phase switching function not available |
| No compatibility |
Possible number of actively controlled wallboxes in the energy management system
| EnergyManager pro | Manager flex | |
|---|---|---|
| Keba | 1 | 3 |
| Webasto (Live/Next) | 1 | 1 |
| Alfen | 1 | 3 |
Installation and configuration
Interface: Ethernet
The wallbox is configured using one of the two software solutions offered by Alfen:
- MyEve App (Android and iOS)
- ACE Service Installer (Windows software)
Applicable documents
Configuration with the MyEve app (recommended)
Alfen documentation for the MyEve app
https://knowledge.alfen.com/space/IN/699498497/MyEve+app
- Install the My Eve app from the Google Play, App Store or Microsoft Store on a mobile device
- Integrate this device into the local network in which the Alfen Wallbox is located. Make sure that both devices are in the same IP address range.
- Open the My Eve app
- The Alfen Wallbox will be displayed under Solo charging station. If the charging station is not displayed:
- Check the availability of the charging station in the network.
- Restart the charging station.
- Restart the network components (router, switch, access point).
- Select the charging station.
- Enter the Alfen device password (you will find this on the nameplate) or scan the QR code on the nameplate (recommended). Click on the blue button next to the password input field.
Basic tab, IP address entry
- Make a note of the IP address of the wallbox
- Click on Update firmware and wait for the update. Log in again if necessary.
Advanced tab
- Call up the Smart Charging category (intelligent charging)
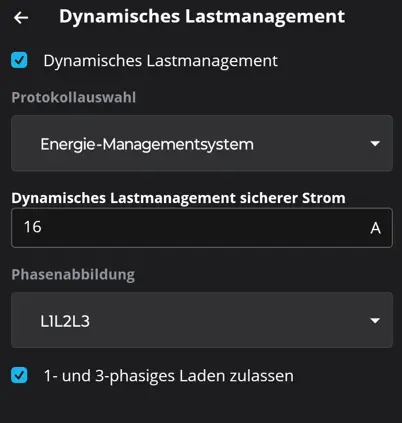
- Select Dynamic load management and make the settings:
- Activate dynamic load management
- Protocol selection: Energy management system
- Dynamic loadmanagement safe current: This is the current that is used for charging if the connection to the energy management system is interrupted. Recommended setting: 16 A
- Enable 1-phase and 3-phase charging
- Click on Save
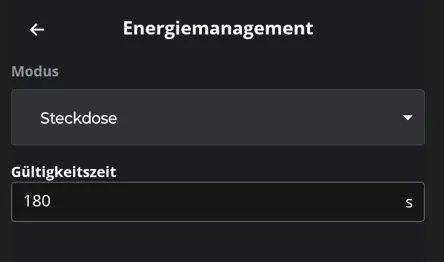
- Under Smart Charging, select Energy management system
- Set a value of 180 s for the validity time .
Configuration with the ACE Service Installer
Prerequisites
- ACE Service Installer software (https://alfen.com/de/search-downloads)
- User account to use this software. You can apply for this via Alfen support (https://alfen.com/de/kontakt).
- Firmware version Alfen: > 4.12.
- The wallbox is installed according to the Alfen Installation instructions.
- The wallbox is connected to the local network.
- Assign a static IP address to the Alfen Wallbox via the router's user interface.
- Active Load Balancing software license must be present and activated.
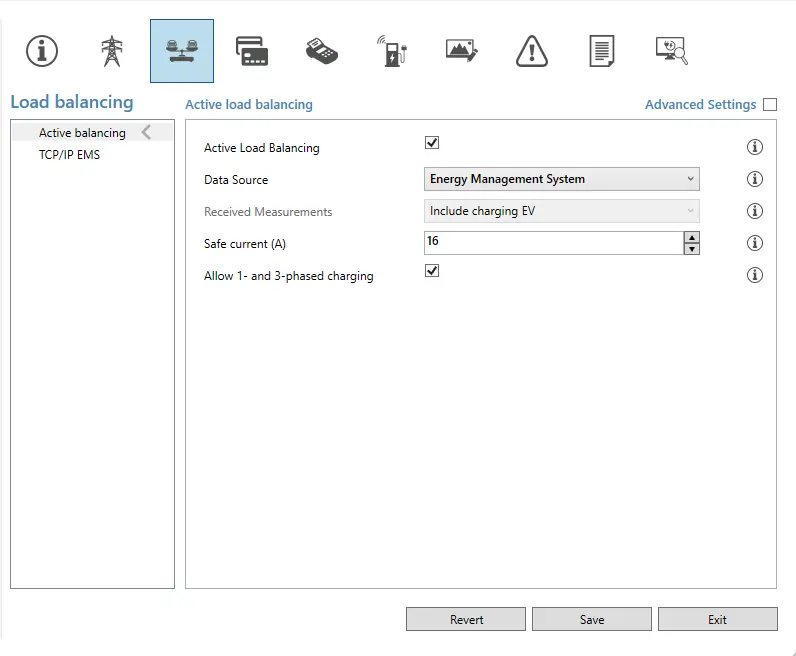
To enable the Manager flex to communicate with the Alfen Wallbox, you must make the following settings in the Alfen ACE Service Installer:
- Activate Active Load Balancing in the Active Balancing submenu in the Load Balancing menu
- Select Energy Management System as the data source
- Activate Allow 1- and 3- phased charging (phase switching)
- Save the settings by pressing Save
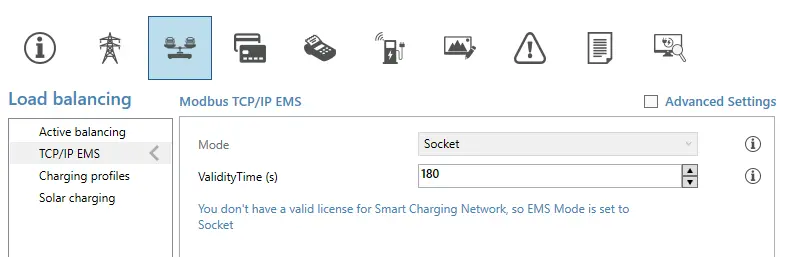
- In the Modbus TCP/IP EMS submenu, enter the value 180 for Validity Time (s).
Note: Increasing the Validity Time improves the control options for the charging station by the manager, even if the network quality is limited.
- Save the settings by pressing Save
Device search in SmartSetup
- Starting the SmartSetup
Certain device types are found and installed automatically(Automatic installation)
Other device types must be installed by selecting the device driver and specifying the IP address or host name(manual installation).
Information on the installation types can be found in the table below.
Automatic installation
If the device is correctly configured and available in the network, it is displayed in green in the device list.
- If necessary, connect additional devices
- Continue with SmartSetup PV systems
Manual installation
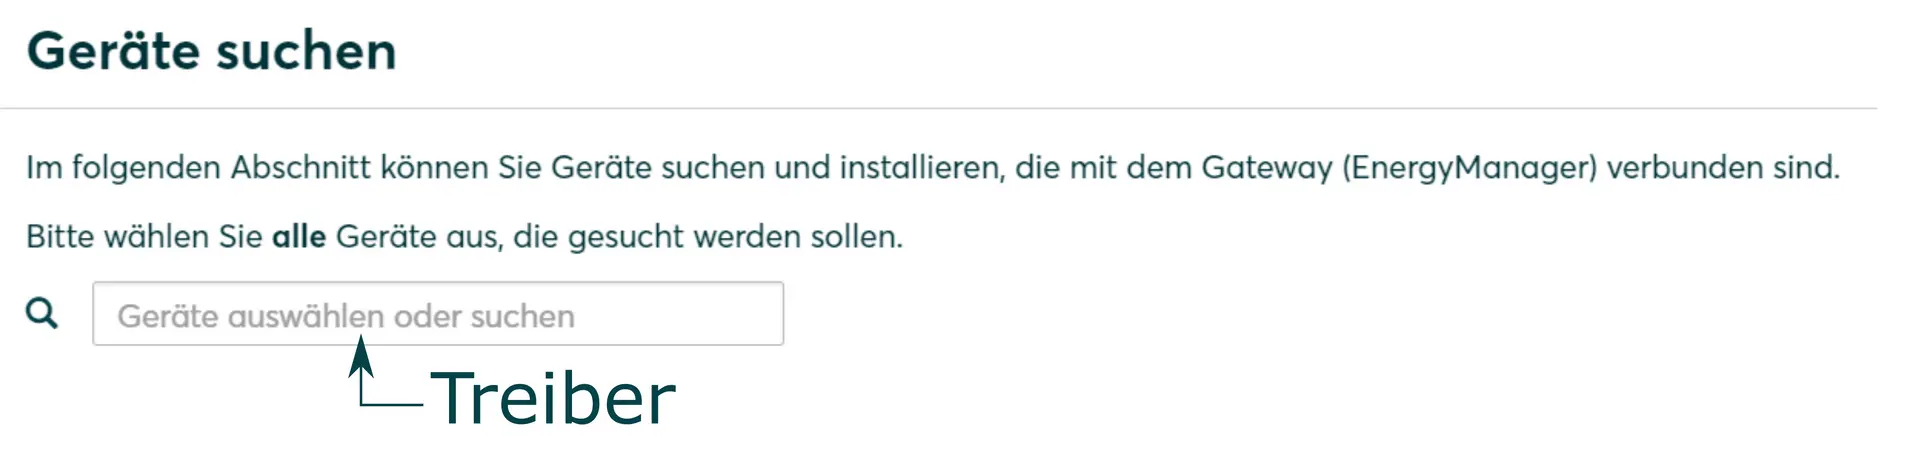
- Select Select devices in the drop-down menu or search for the corresponding entry according to the table below.
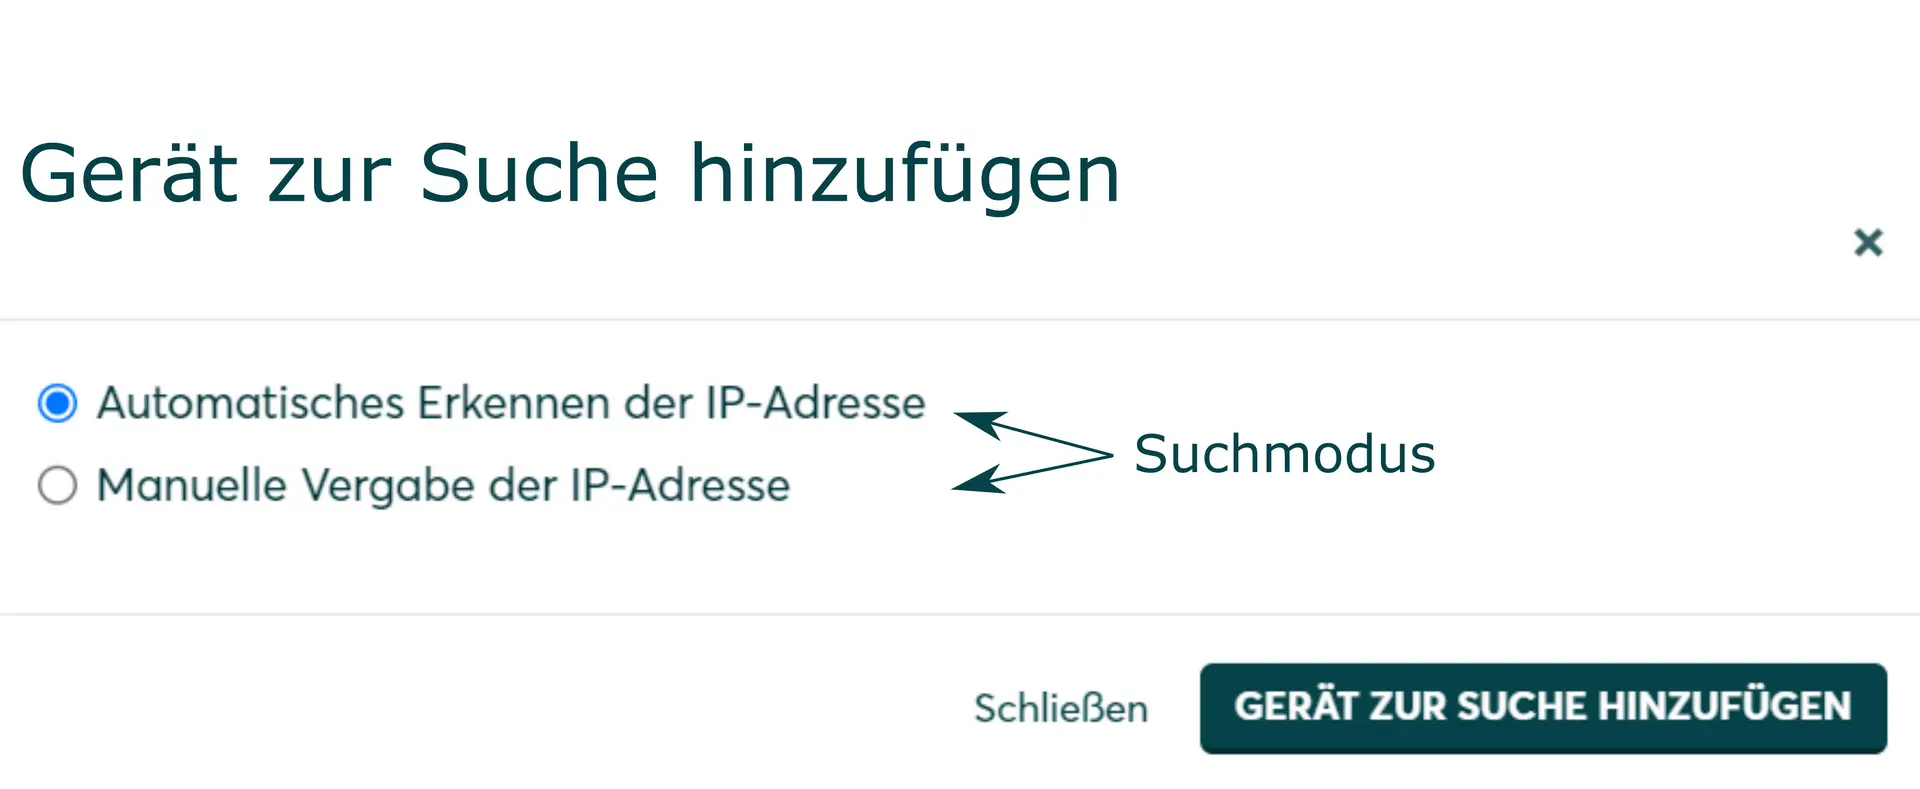
- Enter the required specifications according to the table below:
- Search mode
- iP address or host name, if applicable
- Click Add device to search.
- If necessary, add further devices to the search.
- Once you have added all the devices to be searched for, click Search for and install devices.
You can recognize correctly installed devices by the message: Device is installed. in the device list. The list also shows the current creation data.
Driver selection for device search
| energyManager pro | Manager flex | ||||
|---|---|---|---|---|---|
| driver | Search mode | Driver | Search mode | ||
| Alfen Eve Single | Alfen Eve Single Pro-Line | Specify IP address* ** | Alfen Single Pro Binding | Specify IP address* | |
*) Assignment of a static IP address (via network settings or router settings) recommended.
**) The IP address of the charging pole is displayed on the start page of the ACE Service Installer software in the left-hand selection field.
Troubleshooting
If the device is not found via the automatic search / automatic IP detection, check whether the device is available in the local network (via network scan - note, a network scan requires the prior consent of your customer - or access to the local user interface of the router).
If necessary, restart the devices.
PV optimization settings
Additional settings are required to operate the device with a maximum proportion of solar power (PV optimization).
The settings for PV optimization are made in the SOLARWATT Manager portal under Energy Optimization.
Selected articles: