- SOLARWATT Battery & Inverter vision
- Operation
- Using the inverter display
Using the inverter display
This page contains information about how to use the on-screen display of the inverter, including an overview of the inverter's system menus.
Standby display
During normal operation, the inverter's LCD display will display basic information about what it is currently doing. To activate the display's integrated backlight to see these values more clearly, press the Checkmark Button (✔) once.
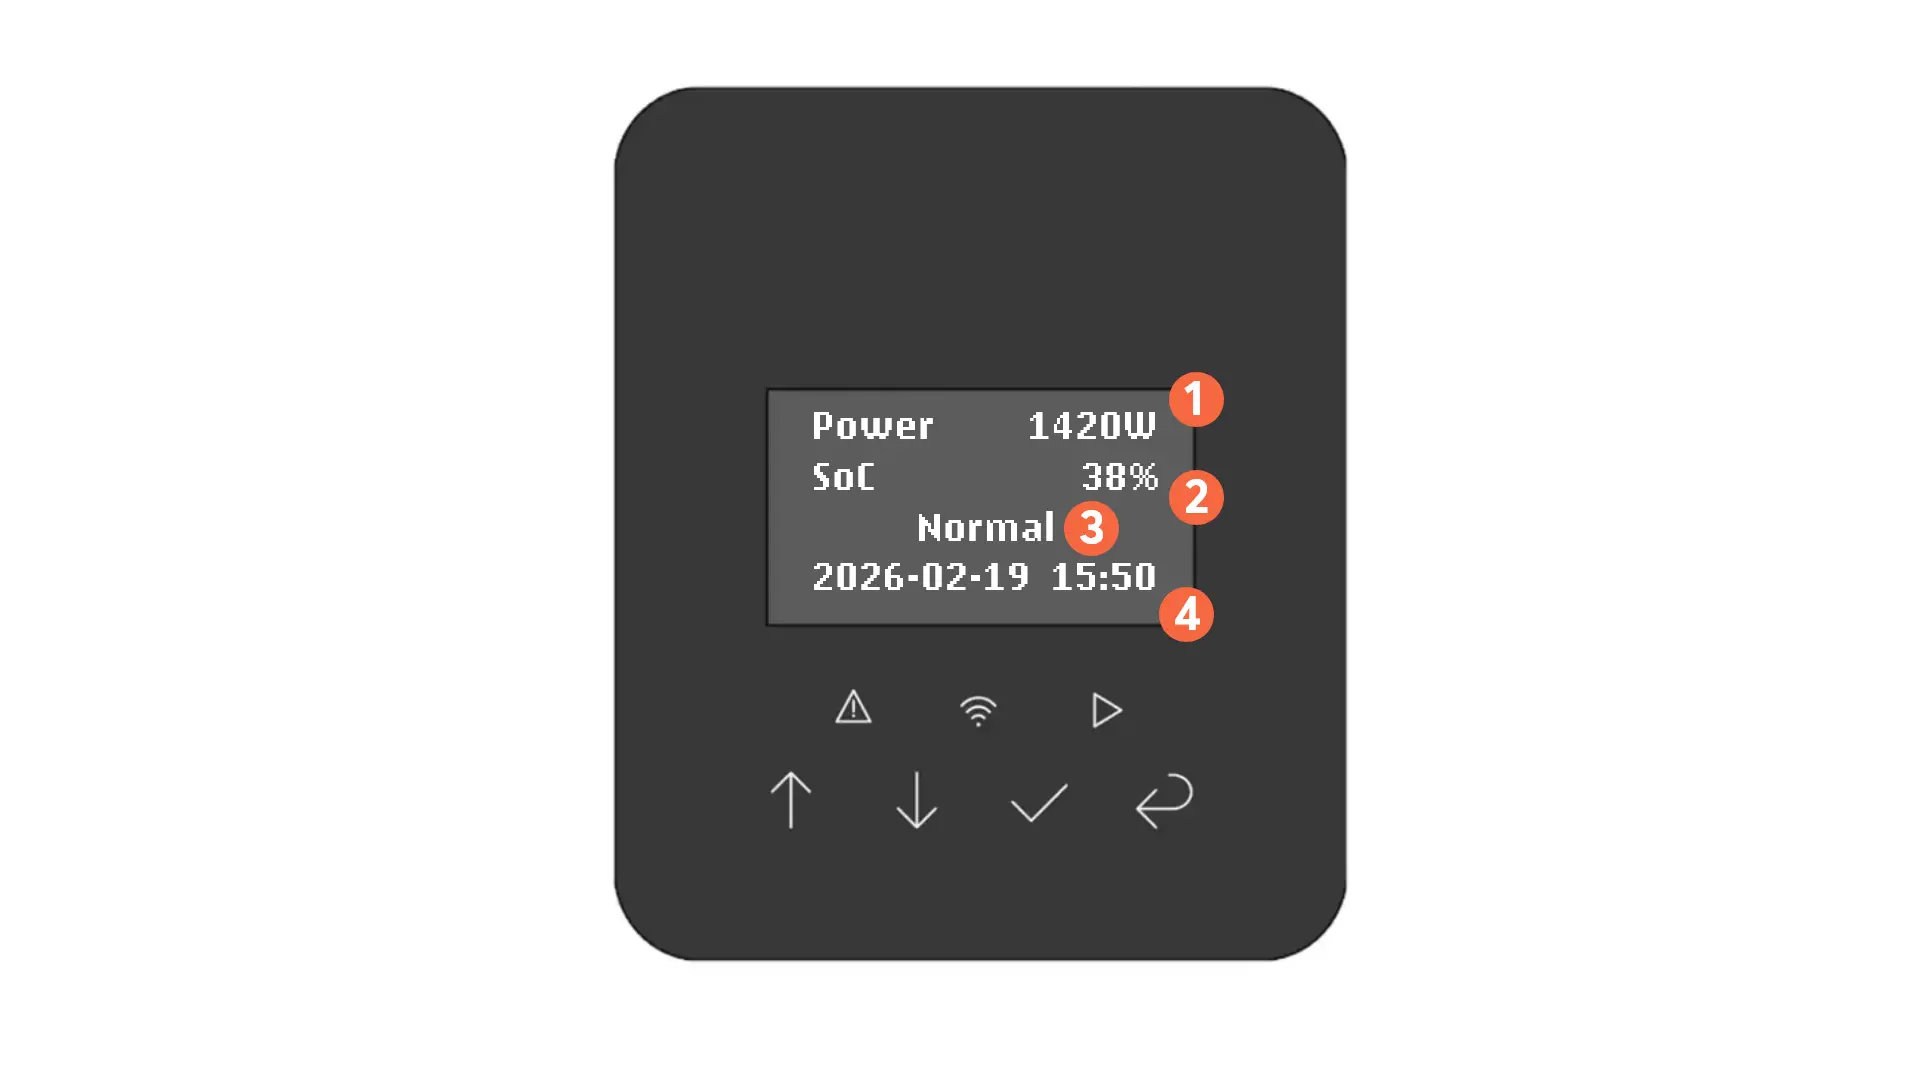
1 | The AC power currently being put through the inverter, in watts (W). This includes both power from PV production and discharge/charge of the battery. If the battery is charging from the grid, this number can appear as a negative value. |
|---|---|
2 | The current charge level, or state of charge (SoC), of the connected SOLARWATT Battery vision (%). |
3 | The current operating status, or the currently active fault. 'Normal' is displayed when the inverter is operating normally, free of faults. 'Off Mode' is displayed when the inverter has power but is not switched on. |
4 | Current system date and time. When connected to the internet, this will be synced to the internet. The date format is in YYYY-MM-DD while the time format is in HH:MM. |
Inverter menu
To access the inverter's menu, while the backlight is active, press the Checkmark Button (✔) again.
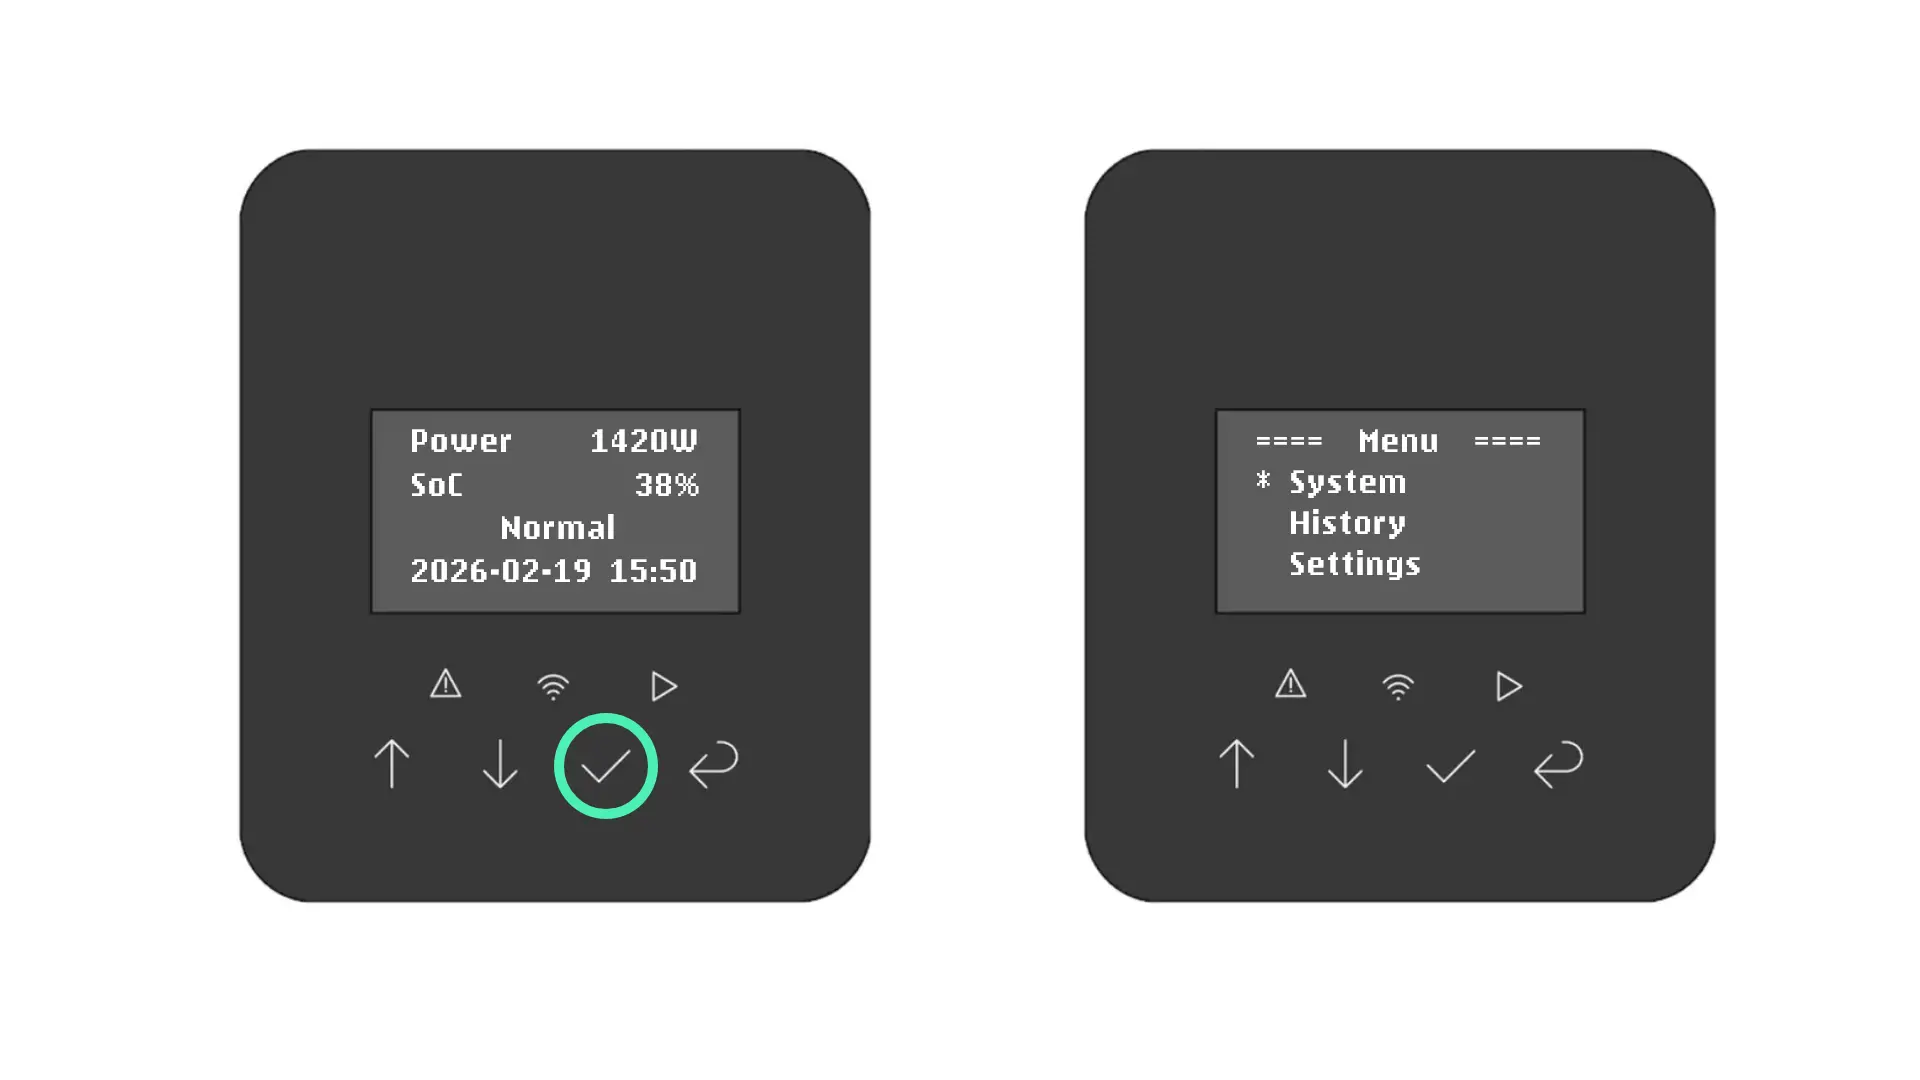
1. System
The system menu lets you view more detailed live datapoints about the system's performance directly on the screen of the inverter.
1.1 Battery
On this screen, you can view information about the connected SOLARWATT Battery vision tower (if a battery is present).
- Voltage of the battery (U)
- Current of the battery (I)
- Power of the battery (P)
1.2 Solar
On this screen, you can view information about the total solar PV generation currently happening on the system.
- Voltage (U1)
- Current (I1)
- Power (P1)
1.3 Grid
This screen displays information about the AC Mains port on the inverter.
- Voltage / Current - ‘U/I’ (A)
- Output power - ‘Pout’ (W)
- Grid power - ‘Pgrid’ (W)
- Frequency - ‘F’ (Hz)
1.4 EPS
This screen displays information about the AC Backup (EPS) port on the inverter.
- Voltage / Current - ‘U/I’ (A)
- Output power - ‘Pout’ (W)
- Frequency - ‘F’ (Hz)
1.5 Temp
This screen displays the current ambient and internal temperature readings of the inverter's built-in sensors (in °C).
2. History
The history menu lets you view yield statistics for the inverter today, as well as past faults on the error log. Please use the SOLARWATT Home app and SOLARWATT Manager portal for more thorough historical data analysis.
2.1 Inverter Yield
The 'History → Inverter Yield' menu lets you view aggregate statistics for specific datapoints for the past day.
Under 'Inverter Yield → PV' you will see the total generation from solar PV today (in kWh).
Under 'Inverter Yield → Charge' you will see the total amount of power (in kWh) the battery has been charged up by today (from either the grid or PV).
Under 'Inverter Yield → Discharge' you will see the total amount of power (in kWh) the battery has been discharged by today.
Under 'Inverter Yield → Feed-in' you will see the total amount of power (in kWh) that has been fed back to the grid today.
Under 'Inverter Yield → Consume' you will see the total amount of power (in kWh) that has been consumed in the house today (as measured by the connected CHINT vision meter)
Under 'Inverter Yield → Consume' you will see the total amount of power (in kWh) that has been consumed on the EPS port today, either from the battery/PV or via passthrough from the AC mains port.
2.2 Error Log
The Error Log will show any fault codes that have been present from the past day, including those both currently active and that have been cleared.
3. Settings
The Settings menu is where you can change the settings of the inverter.
Each time you access the Settings menu, you will be prompted to enter a password. The default password of the settings menu is '0000' and may be changed in the 'Password' submenu.
If you changed the inverter's password but have now forgotten it, please contact SOLARWATT Service who can reset it for you.
3.1 Language
This lets you change the language of the inverter display.
Available languages include English, German, Spanish, Italian, Portuguese and French. English is the default language.
3.2 Date & Time
This lets you change the current inverter date and time. This option must be set during the 'Power on Set' process when first commissioning a SOLARWATT Inverter.
Afterwards, you shouldn't need to modify this setting as it will be automatically synced with the internet time when connected to Wi-Fi or via LAN cable.
3.3 Work Mode
This lets you change the inverter's Work Mode. The Work Mode of the inverter governs its behaviour with respect to where energy is being sent in the house.
We strongly discourage changing the work mode of the inverter to a value other than the default 'Self Use' and instead use the SOLARWATT Home app and Manager portal to manage the system's optimisation by entering your electricity tariff information or by using the scheduling feature of the SOLARWATT Manager.
This is because the work mode setting specified on the SOLARWATT Inverter generally takes priority over settings made on the SOLARWATT Manager, which can cause issues.
An overview of the available work modes can be found below.
| Work Mode | Description |
|---|---|
| Self Use | The default work mode designed to make maximum use of generated and stored solar power to satisfy consumption. When there's solar power, it will be used in this order of priority:
|
| Feed-in First | A work mode designed to feed in to the grid before charging the battery:
|
| Peak Shaving | A complex work mode designed to reduce, but not completely prevent, import from the grid during peak times. You must specify a Charge Time (see 3.3.2) for this work mode to take effect. |
| Force Charge | Force charges the battery from the grid. |
| Force Discharge | Force discharges (empties) the battery. During a force-discharge, energy will:
|
3.3.1 Mode Select
This menu lets you change the default work mode. You can pick from 'Self Use', 'Feed-in First' and 'Peak Shaving.'
Since you never want to Force Charge and Force Discharge all the time, you need to use the 'Charge Time' menu to schedule when to Force Charge (see below); during unscheduled hour blocks, the default work mode set in this menu will be used instead.
3.3.2 Charge Time
This menu lets you program in up to two periods where your SOLARWATT Battery will enter the Force Charge work mode to charge from the grid.
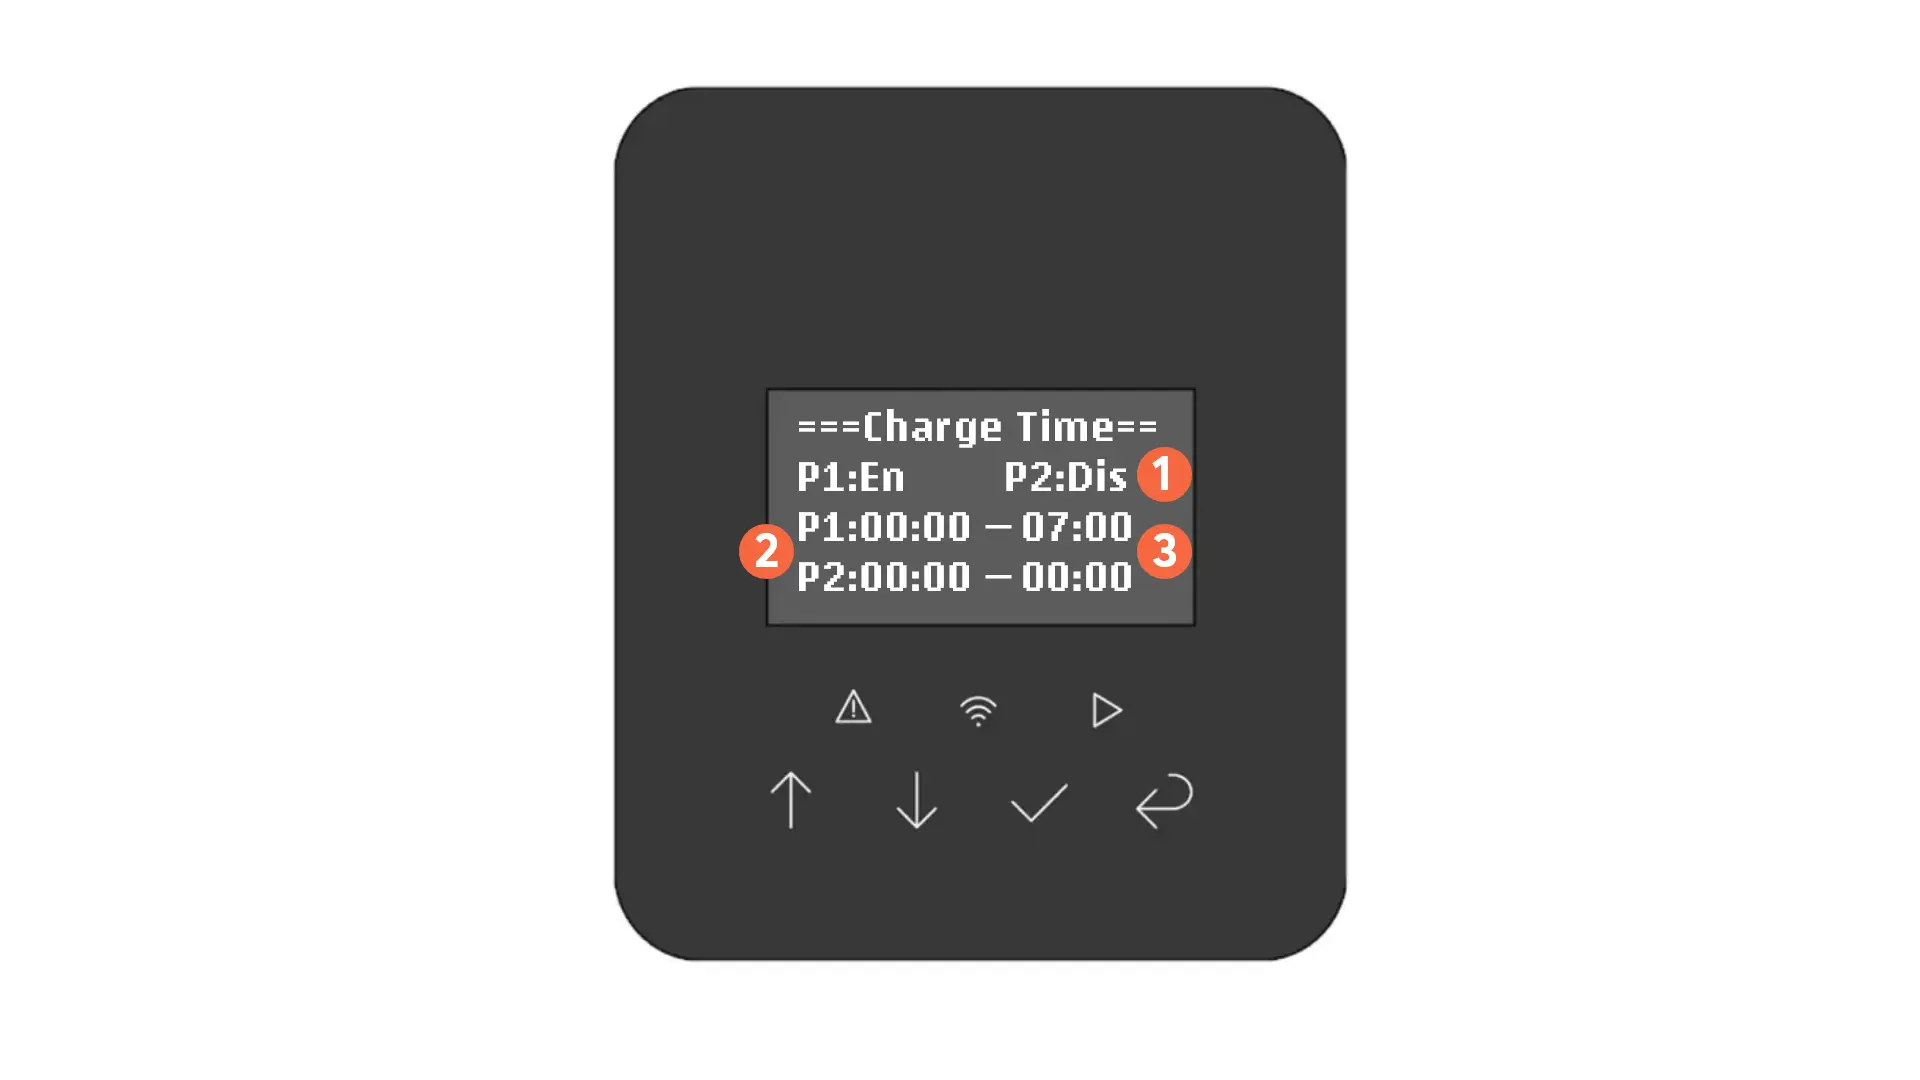
The Charge Time menu is navigated using the Up (↑) and Down (↓) Arrow Buttons (to increment/decrement each value) and Checkmark (✔) and Back (↵) buttons to continue/go back.
The menu is laid out as follows:
1 | Current setting value of Period 1 (P1) and Period 2 (P2)
|
|---|---|
2 | Start time of Period 1 (HH:MM) Start time of Period 2 (HH:MM) |
3 | End time of Period 1 (HH:MM) End time of Period 2 (HH:MM) |
On the example image above, the Inverter is set to charge from the grid between 00:00 (midnight) until 07:00 (7 a.m.).
To clear a period, the start and end time must both be set to 00:00.
3.4 Start/Stop
The Start/Stop screen lets you turn the inverter on/off, changing between 'Off Mode' and 'Normal' operation. When in Off Mode, the inverter can...
- still communicate with the internet to carry out firmware updates
- still communicate with the SOLARWATT Manager to provide data from the connected meter for managing household consumption
- charge the connected SOLARWATT Battery vision from PV-generated power
However, the inverter will not put any AC power in/out from the grid (aside from a nominal amount to continue to supply power to the inverter).
3.5 On-Grid
The On-Grid menu lets you change settings related to grid conformity. Notably, within this menu you are able to set an export limit.
The Safety menu lets you change the current grid code.
After changing the grid code, the inverter will display 'Checking' and carry out a self-test to make sure the grid parameters are expected.
Please check the table below for the correct grid code setting for the UK and Ireland. Please ensure you have approval from the local DNO before selecting a grid code.
| Applicable to | Grid code | Inverters | Self-check |
|---|---|---|---|
| England Scotland Wales | G98_UK | Inverter vision one 3-3.7kW Inverter vision three 5-10kW | 60 seconds |
| G99_UK | Inverter vision one 4.6kW+ Inverter vision three 12kW+ | ||
Northern Ireland
| G98_NI | Inverter vision one 3-3.7kW Inverter vision three 5-10kW | |
| G99_NI | Inverter vision one 4.6kW+ Inverter vision three 12kW+ | ||
| Republic of Ireland | Ireland-Micro | Inverter vision one 3-5kW Inverter vision three 5-12kW | 300 seconds |
| Ireland-Mini | Inverter vision one 6kW+ Inverter vision three 15kW+ |
The Export Control menu lets you set a G100 compliant export limit on the inverter (as well as an import limit, if you want).
The inverter will automatically curtail consumption/charging/discharging behaviour to respect these values accordingly.
Note: if you are installing a cluster system, you must set the export limit on each inverter.
| ExportLimitPwr | Maximum power, in W, that can be fed back to the grid (the export limit). |
|---|---|
| ImportLimitPwr | Maximum power, in W, that can be imported from the grid. |
| ExportLimitCur | Maximum current, in A, that can be going to the grid at any given time. |
| ImportLimitCur | Maximum current, in A, that can be coming from the grid at any given time. |
The Power Limit screen lets you set an overall curtailment value by which the inverter should be derated. The default value is 100% (zero curtailment).
Note: this can also be set as a global value on the SOLARWATT Manager; please take care to only set this value in one place.
This screen allows grid code-defined settings values to be manually adjusted. Use the Back (↵) button to exit this screen and do not make any changes here.
This screen allows grid code-defined settings values to be manually adjusted. Use the Back (↵) button to exit this screen and do not make any changes here.
This screen allows grid code-defined settings values to be manually adjusted. Use the Back (↵) button to exit this screen and do not make any changes here.
This screen allows grid code-defined settings values to be manually adjusted. Use the Back (↵) button to exit this screen and do not make any changes here.
Tip: If you are looking to set an export limit, this is done under 'Export Control' instead.
3.6 Off-Grid
The Off-Grid menu lets you change settings related to the EPS (emergency power supply backup) mode of the inverter.
The 'EPS Output' screen lets you change the mode of the Emergency Power Supply (EPS) port of the inverter. We recommend keeping this on the default UPS Mode setting, but you can also disable output on the port altogether on this screen if you wish.
Here, you can set the frequency of the circuits to be powered from the EPS port of the inverter (default is 50 Hz, in line with national regs)
Here, you can set the voltage of the circuits to be powered from the EPS port of the inverter (default is 230 V, in line with national regs)
3.7 Battery
The Battery menu lets you change settings related to the charging and discharging of the connected SOLARWATT Battery vision.
The Safety menu lets you change the current grid code.
After changing the grid code, the inverter will display 'Checking' and carry out a self-test to make sure the grid parameters are expected.
Please check the table below for the correct grid code setting for the UK and Ireland. Please ensure you have approval from the local DNO prior to the installation date.
| Applicable to | Grid code | Inverters | Self-check |
|---|---|---|---|
| England Scotland Wales | G98_UK | Inverter vision one 3-3.7kW Inverter vision three 5-10kW | 60 seconds |
| G99_UK | Inverter vision one 4.6kW+ Inverter vision three 12kW+ | ||
Northern Ireland
| G98_NI | Inverter vision one 3-3.7kW Inverter vision three 5-10kW | |
| G99_NI | Inverter vision one 4.6kW+ Inverter vision three 12kW+ | ||
| Republic of Ireland | Ireland-Micro | Inverter vision one 3-5kW Inverter vision three 5-12kW | 300 seconds |
| Ireland-Mini | Inverter vision one 6kW+ Inverter vision three 15kW+ |
The Export Control menu lets you set a G100 compliant export limit on the inverter (as well as an import limit, if you want).
The inverter will automatically curtail consumption/charging/discharging behaviour to respect these values accordingly.
Note: if you are installing a cluster system, you must set the export limit on each inverter.
| ExportLimitPwr | Maximum power, in W, that can be fed back to the grid (the export limit). |
|---|---|
| ImportLimitPwr | Maximum power, in W, that can be imported from the grid. |
| ExportLimitCur | Maximum current, in A, that can be going to the grid at any given time. |
| ImportLimitCur | Maximum current, in A, that can be coming from the grid at any given time. |
The Power Limit screen lets you set an overall curtailment value by which the inverter should be derated. The default value is 100% (zero curtailment).
Note: this can also be set as a global value on the SOLARWATT Manager; please take care to only set this value in one place.
This screen allows grid code-defined settings values to be manually adjusted. Use the Back (↵) button to exit this screen and do not make any changes here.
This screen allows grid code-defined settings values to be manually adjusted. Use the Back (↵) button to exit this screen and do not make any changes here.
This screen allows grid code-defined settings values to be manually adjusted. Use the Back (↵) button to exit this screen and do not make any changes here.
3.8 Feature
The Feature menu lets you change settings related to Bluetooth, the DRM port, PV stringing, the meter being used, AFCI, and behaviour during EPS mode.
This setting is not used and should not be modified.
This setting is reserved to allow you to modify the behaviour when DRM signals are received on the inverter's DRM port in a future firmware update.
Currently, this setting is not used and should not be modified.
This setting is not used and should not be modified.
This setting lets you change the type of meter that is connected to the inverter, or disable it altogether.
| Setting | Value |
|---|---|
| Meter_1P | A single-phase CHINT DDSU 666 (Solarwatt ver.) meter is connected. (only available on SOLARWATT Inverter vision one) |
| Meter_3P | A three-phase CHINT DTSU 666 (Solarwatt ver.) meter is connected. |
| Disable | No meter is connected to this inverter. You should only choose this value if...
|
Please note that the installation of a meter is required when a battery is connected to the inverter (unless the inverter is wired as part of a single- or three-phase cluster system). A G100 State 3 error will appear if no meter is installed but Meter_1P or Meter_3P is set under Meter/CT.
This setting is not used and should not be modified.
This lets you turn AFCI (Arc Fault Circuit Interruption) on/off, which means the inverter will automatically shut down in the event that arcing is detected on a connected PV string.
By default, AFCI is enabled. We do not recommend switching it off outside of exceptional circumstances.
The Grounding setting allows you to enable/disable the N-PE coupling setting during EPS mode. This should not be changed from the default value set when the grid code is entered.
This setting lets you enable / disable the inverter's automatic recovery function when the power draw on the circuits powered by the EPS port of the inverter exceed its maximum rating (are 'overloaded') for more than 60 seconds. This is enabled by default.
By disabling it, the inverter must be manually switched back on when an EPS Overload occurs. See Behaviour during power cuts for more information.
This lets you enable / disable the Standby behaviour setting of the inverter. This setting should not be modified as enabling it can cause communications issues with the SOLARWATT Manager when the inverter enters a standby state.
This lets you change the BAUD rate of the inverter's UART protocol functionality. This setting is not used and should not be modified.
3.9 Communication
The Communication menu is for special service diagnostics of the inverter-meter communication protocol. Use the Back (↵) button to exit this screen and do not make any changes here.
3.10 Password
The Password screen lets you change the inverter's password, which you must enter to access the Settings menu. The default device password is 0000.
Use the Up (↑) and Down (↓) Arrow Buttons to increment/decrement each digit and Checkmark (✔) and Back (↵) buttons as confirm/backspace.
Press the Checkmark Button (✔) again to confirm your new password entry.
3.11 Parallel
The Parallel menu lets you configure the Address and Number values of the inverter in a parallel system. Accessing this menu is required for commissioning a system comprised of multiple connected single-phase SOLARWATT Inverter vision one inverters.
For details on how to use this menu, see Setting up an Inverter vision one cluster.
3.12 Reset
The Reset menu lets you clear errors and perform a factory reset of the device.
Please take caution when using this menu as it may cause settings to be lost!
The 'Reset Error Log' function clears the list of faults that have occurred in the past 24 hours (which can be viewed in the History menu). You should not use this function.
The 'Reset Arc Fault' lets you clear any AFCI faults that have been detected. This will clear any current 'AFCIFault' codes being reported on the standby display screen. Please contact SOLARWATT Service should you require assistance isolating an arc fault with a SOLARWATT Inverter.
The 'Reset Yield' function lets you reset the 24-hour yield statistics that can be viewed from within the 'History' menu. You should not use this function.
The Factory Reset function lets you reset the inverter to its factory default settings. After the device has performed a factory reset, you will be returned to the Power-On Set menu and should follow the commissioning instructions to restore the device to operation.
Please note: in addition to the on-screen settings, this function also clears the active Wi-Fi configuration. Should you need to factory reset the inverter, please remember to re-configure the device's Wi-Fi network using the SOLARWATT Pro app.
4. About
The 'About' menu lets you view core system information, such as model information, serial number and firmware versions.
4.1 Model
Displays the inverter's model number (see below for reference on which product each model code refers to).
| Model code | Inverter model |
|---|---|
| VSN ONE 3KW | SOLARWATT Inverter vision one 1.0 (3 kW) |
| VSN ONE 3.7KW | SOLARWATT Inverter vision one 1.0 (3.7 kW) |
| VSN ONE 4.6KW | SOLARWATT Inverter vision one 1.0 (4.6 kW) |
| VSN ONE 5KW | SOLARWATT Inverter vision one 1.0 (5 kW) |
| VSN ONE 5KW-NL | SOLARWATT Inverter vision one 1.0 (5 kW, NL) |
| VSN ONE 6KW | SOLARWATT Inverter vision one 1.0 (6 kW) |
| VSN ONE 6KW-FR | SOLARWATT Inverter vision one 1.0 (6 kW, FR) |
| VSN THREE 5KW | SOLARWATT Inverter vision three 1.0 (5 kW) |
| VSN THREE 6KW | SOLARWATT Inverter vision three 1.0 (6 kW) |
| VSN THREE 8KW | SOLARWATT Inverter vision three 1.0 (8 kW) |
| VSN THREE 9.9KW | SOLARWATT Inverter vision three 1.0 (9.9 kW) |
| VSN THREE 10KW | SOLARWATT Inverter vision three 1.0 (10 kW) |
| VSN THREE 12KW | SOLARWATT Inverter vision three 1.0 (12 kW) |
| VSN THREE 15KW | SOLARWATT Inverter vision three 1.0 (15 kW) |
4.2 Serial No
Displays the inverter's serial number.
4.3 Inv Ver
Displays the version of the currently installed inverter firmwares.
| Type | Description |
|---|---|
| Master | The 'Master' firmware controls digital signal processing (DSP) and the core power electronics of the device, including Maximum Point Tracking for PV generation and handling of AC grid input/output. |
| Manager | The 'Manager' firmware controls overall system performance, manages data logging, and handles user-facing display and settings, as well as communication with the SOLARWATT Manager. |
| Slave | The 'Slave' firmware controls secondary processing and system safety. |
Note: to update these firmware versions, please use the SOLARWATT Pro app (for installers) or SOLRWATT Home app (for end customers) and follow the steps to connect to the inverter via Bluetooth to run the updates.
4.4 Bat Ver
Displays the version of the currently installed firmwares on the connected SOLARWATT Battery vision top pack and sequenced packs.
| Type | Description |
|---|---|
| M | SOLARWATT Battery vision Battery Management System (BMS) firmware version. This firmware manages the synchronisation and management of charge/discharge cycles of each pack in the tower. |
S1 S2 S3 S4 S5 S6 S7 S8 | SOLARWATT Battery vision pack firmware versions. 'S1' is the top pack's battery firmware versions, with the packs following in 'S2' to 'S8'. This firmware handles management and datalogging of per-pack cell performance and responds to synchronisation commands issued by the BMS. |
| IV | SOLARWATT Battery vision IVU firmware version. This is the secondary firmware installed on the battery which manages inverter communication. |
4.5 Safety
Displays the currently configured grid code (e.g. G98_UK). Please use the 'Settings' menu should you need to change it.
Please check the datasheet for a list of supported grid codes.